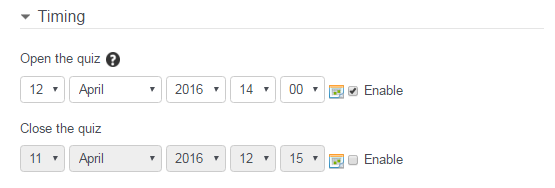
In examining the timing block, we are going to use a “traditional” quiz or exam example – for a test that opens at a specific time, say 2 pm on Tuesday afternoon, and closes at 4 pm that same day. “Take home tests,” or tests than can be taken over a weekend, have a slightly different best practice method.
All assignments are connected to the calendar, so adding an open time and a close time to the quiz will connect them to the student’s calendar in VSTAR Learn.
If none of the features are enabled, and an open time is not set, and access to the quiz is not restricted by other means, the quiz will be available to the students as soon as it is built.
Open the Quiz
Check the “Enable” button and set the date and time you would like for the quiz to be open. This is when students will first be able to attempt the quiz. Before this time, students will be able to see that a quiz is available, and if you have provided a description for the quiz and made that available on the course page, students will be able to see that.
In the example below, I checked “enable,” which has given me access to the drop down menus, and this has allowed me to set the date and time for next Tuesday at 2 pm.
Close the Quiz
Check the “Enable” button and set the date and time you would like for the quiz to be close. This is the last time the students will be able to answer any questions on the quiz. When the quiz closes, the students will no longer be able to access it. At a later point, if you wish, you can set up a time for students to review the quiz.
In the example below, I checked “enable,” which has given me access to the drop down menus, and this has allowed me to set the date and time for next Tuesday at 4 pm.
Your students will have a timer that will count down the amount of time they have left while taking the quiz starting at a half hour before the quiz closes.
Time Limit
If you want, you can also choose to enable a time limit. This will set a certain amount of time that your students have to complete the quiz. The closing time supersedes the time limit. For example, if your set an hour time limit, and quiz closes at 4 pm, and you have a student begin the quiz at 3:45 pm, he will only have until 4 pm to complete the quiz, not 4:45 pm. However, all your students beginning at 2 pm will have 1 hour to complete the quiz if you choose to set that 1 hour time limit. This may be useful for take home tests, just make sure that you explain the time limit in your description area so that the students understand the constraints of the quiz.
When Time Expires
The default option is that “Open attempts are submitted automatically.” The best practice is to leave this default setting in place. This will ensure that if a student has not submitted the exam when the time runs out, their attempted answers will be scored. The student will not be able to answer any more questions, but the answers they have completed will be submitted by the system.
Another option includes “There is a grace period when open attempts can be submitted, but no more questions answered.” If this is selected, the student has to actually click the submit button when the time expires.
The last option is “Attempts must be submitted before time expires, or they are not counted.” If this selected, if students have not submitted their answers, they will not be scored. This can cause a problem if there are technical glitches during the exam, so this selection is not recommended.
Submission Grace Period
If under “When time expires” the options for “There is a grace period” is selected, you have the option of setting the length of time a student is allowed to go back in and hit the submit button. It is recommended you choose an amount of time reasonable to the exam period.


