There are several reasons a faculty member might need to edit a gradebook. For example, you may have offered two versions of an activity and allowed students to choose the one they wished to complete. VSTAR Learn automatically calculates grades as if all students in a course took an activity. In order to make sure your student’s grades are calculated correctly, and that students are not penalized for not completing activities that are not required, you would would want to make changes.
You can make changes to the gradebook manually. However, since the gradebook consists of a large amount of data, you may find that it is easier to download a copy of the gradebook to Excel or another spreadsheet editing program and then import the gradebook back into VSTAR Learn.
Step 1
Begin with an exported gradebook file. This is an Excel file with grade information from a course I’ve created in VSTAR Learn.

Step 2
Make the appropriate changes to your grades. Remember what you have changed! You will need to tell VSTAR Learn later when you upload the file what to overwrite in the online gradebook.
Best practice tip #1: Don’t make any changes to the “Email address” field. This is how VSTAR matches up the grades when we load the file back into the system.
Now that I’ve edited my data, my gradebook Excel file looks like this:

Changes include:
A) On the second quiz, I had an optional question. In this case, I’ve added an extra point for all students so that there was no penalty for not answering the optional question.
B) There was an outside practical assignment done on the last day of class. Now I need to add it to VSTAR to make sure my students can view their grades, and to make sure it gets calculated into the course total.
C-E) The grading scheme for this course was to give 50% of the credit for assignments and 50% for quizzes. These calculations appropriate calculate the course total. These do not need to appear in VSTAR but are included on my spreadsheet.
F) This is the course total, and will need to appear in VSTAR.
G) Finally, this is the student’s letter grade. I would like for it to appear in VSTAR before the grade is released.
Step 3
When you’ve completed editing your file, save it in .csv format. In Excel, click on “File” then “Save As.” When given the option to name your file, make sure you select CSV (comma delimited) as the Save as type. This will ensure VSTAR can read your file correctly. If you get a message saying that your file contains features that are not compatible with the CSV file format, click yes to save, the format will work for our purposes.


Step 4
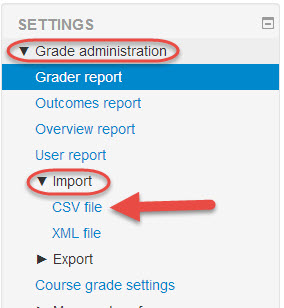
Log into VSTAR Learn, and navigate to your course. Make sure that you have the editing turned on. Under settings, click on “Course Administration,” then “Grades.” This will open up the special “Grade administration” submenu. From here, you will want to click “Import.” Under “Import,” click “CSV file.” This will allow us to upload the CSV file you just saved to your VSTAR Learn gradebook.

Step 5
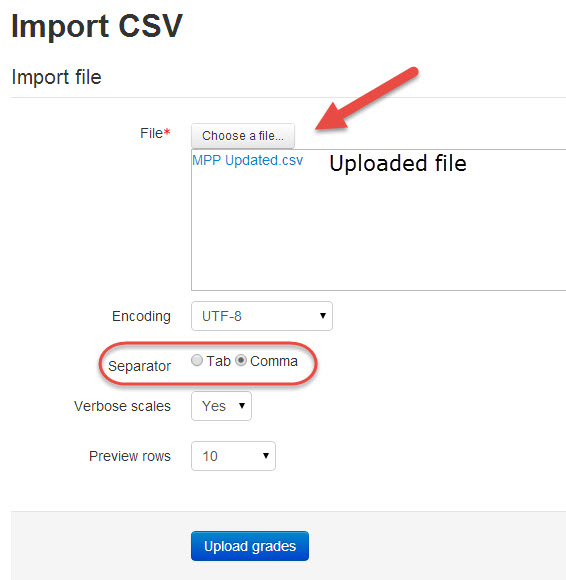
Using the “Choose a file…” button, navigate to your saved .csv file. Once it’s uploaded, it will appear in the box below. Use the default settings, and make sure the “Separator” is set to “Comma.” Then click “Upload grades.”

Step 6
The top of the next page will give you a preview of what you’re uploading, generally the first 10 rows of your spreadsheet. If you scroll down, though, you’ll see several questions, which you have to answer to give VSTAR Learn the data it needs to understand how to interpret the data you’ve just uploaded.
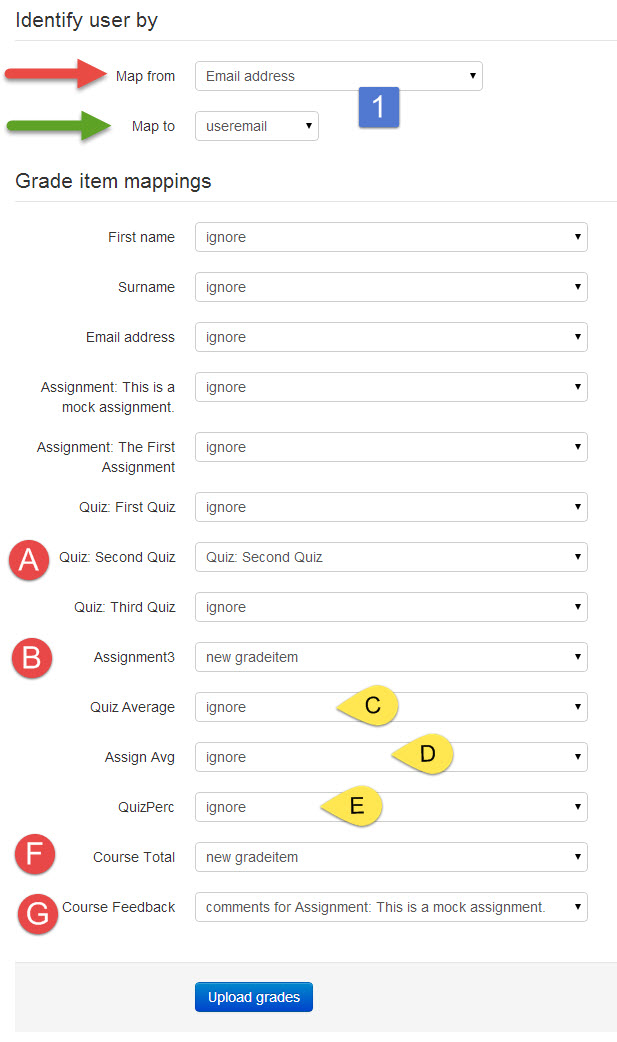
Check out the blue #1 at the top of the image below. This is part of the “Identify user by” heading. This is how you tell VSTAR Learn which student the grades belong to. The easiest way to do this, as long as you haven’t changed the student’s email addresses on your spreadsheet, is with their email address. So in the “Map from” drop down list, select “Email address.” In the “Map to” drop down list, select “useremail.” When the grades are uploaded, the system will check to make sure that each student’s email address matches what it has on file, and then will update the grades based on your spreadsheet.
The grade item mappings can change based on what your assignments and quizzes you have for your class and what manipulations you’ve made on your spreadsheet. I’ll explain the changes I’ve done here using my example from Step 2.

A) In step 2, I changed the grades for the second quiz because I wanted to make sure that students weren’t penalized for choosing not to answer an optional question. I want to make sure that’s reflected correctly in VSTAR. So, I want the grade for the grade on my spreadsheet to overwrite the grade in VSTAR Learn. To do this, I select the quiz item from the drop down menu. I’m telling VSTAR to ignore all other quizzes because I don’t want any of those grades to be changed.
B) Assignment3 is a new assignment, and I want the students to see this in their gradebook. I’m uploading this as a new assignment from my spreadsheet, and so I’m selecting new gradeitem from the drop down menu next to the Assignment3 item under “Grade item mappings.”
C-E) These items I added to my spreadsheet, but they were calculations for creating the grade, and I don’t really want the students to see them. I’m telling VSTAR to ignore them, so they won’t be added to the gradebook.
F) Course Total is the student’s average for the course, and it is a new item in the gradebook. I want the students to see it, so I’m adding it as a new gradeitem in the drop down menu.
G) Course Feedback is the student’s actual letter grade – a P or P*. I would like for it to appear in the gradebook. I am adding it as a comment on the first general assignment, since I do not have a comment field to attach it to.
Best Practice tip #2: The gradebook will take numerical values easily as new grade items, but not comments. Comments can be easily uploaded into existing comment fields.
When you have completely filled out the form, click “Upload grades.”
Step 7
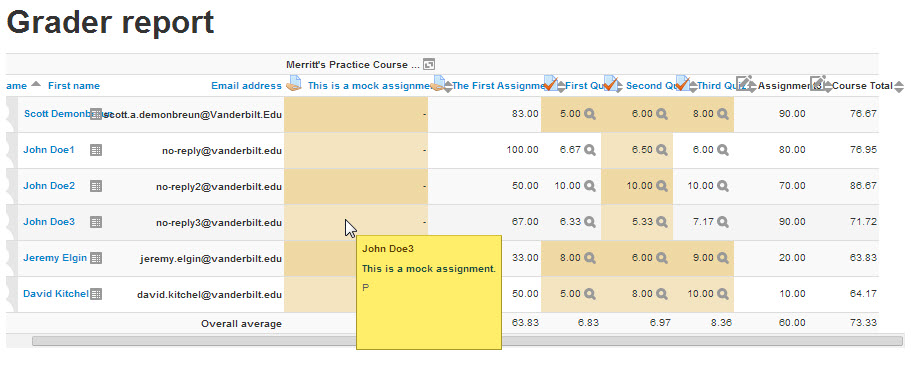
Verify that grades have uploaded correctly by viewing the grader report. In this case, since I uploaded comments, they are visible by hovering over the assignment with the associated comment.

