Setting Up an Activity in VSTAR Portfolio
The Create New Activity function is available only to those with Admin or Super User status within the Portfolio system. If you believe you need to build forms and you do not have this level of access, please contact OEIT by clicking on the “help” icon and open a ticket.
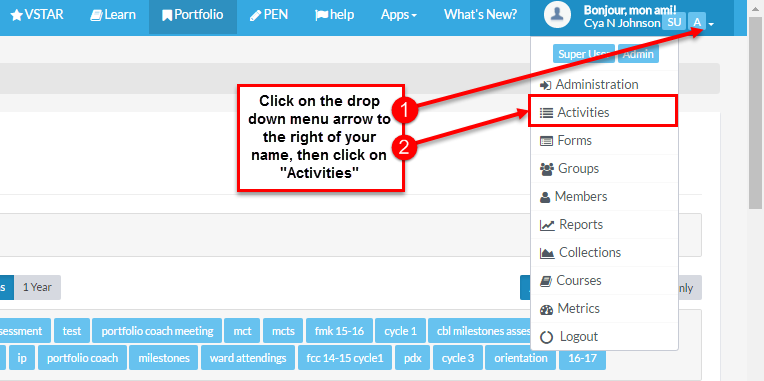
To setup an Activity in Portfolio, you will need to first logon to VSTAR Portfolio. Next, click on the drop-down menu arrow to the right of your name, then click on “Activities”:
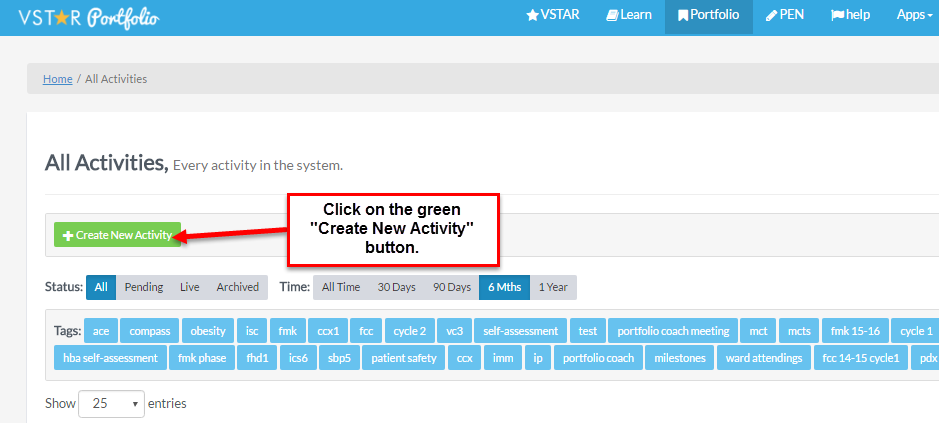
You will see the Administration page for VSTAR Portfolio Activities. To create or setup a new Activity, click on the green “Create New Activity” button:
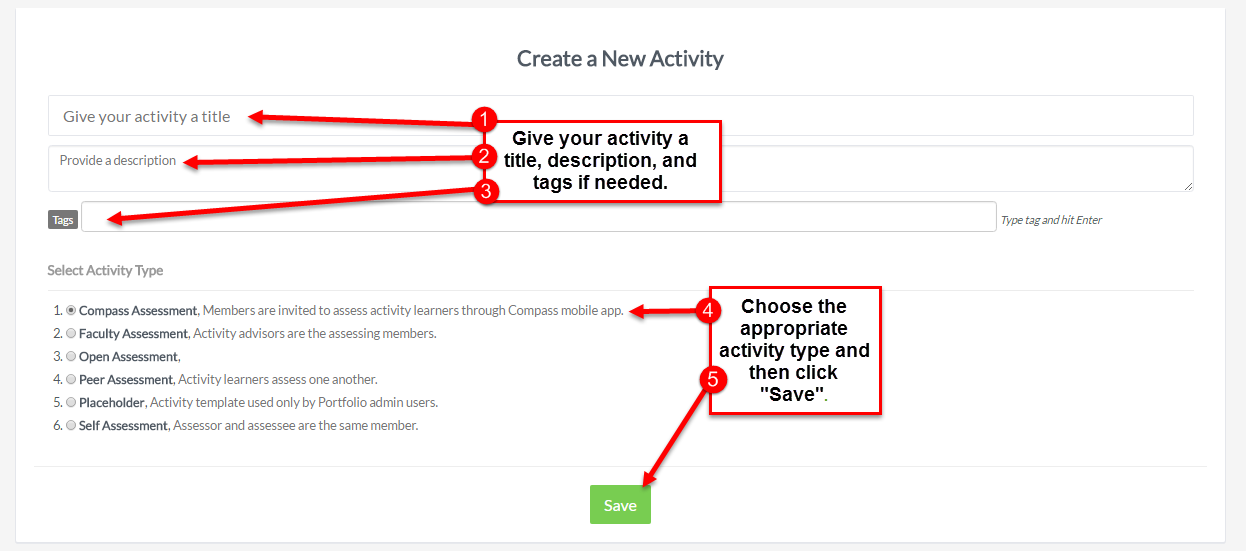
You will see the “Create a New Activity” section. Click on the text boxes to type in an Activity title, a description and tags if needed. Then choose the type of assessment: Compass, Faculty, Open, Peer, Placeholder, or Self-Assessment. Then click the green “Save” button.
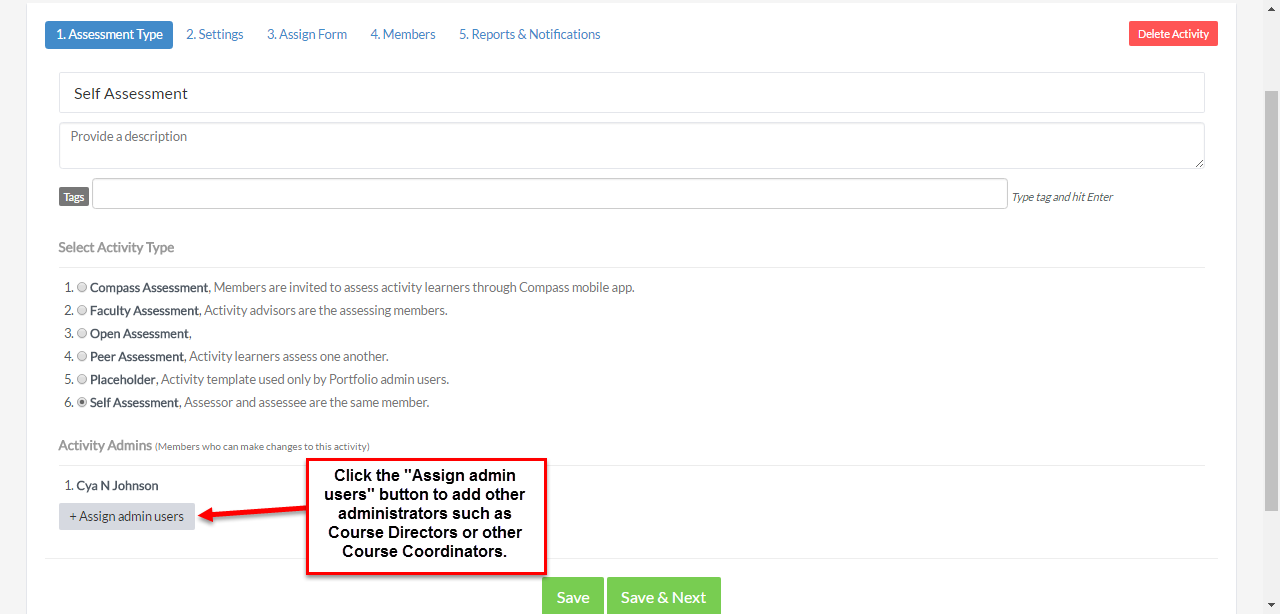
After clicking “Save”, you will see the first of five Activity Setting sections, “Assessment Type” where you will automatically be set as an activity owner/administrator who can make changes to the activity. Use the “Assign admin users” button to add other administrators such as Course Directors or other Course Coordinators. Be sure to click the green “Save” button to save changes or the “Save & Next” button to save and continue to the next Activity Setting section.
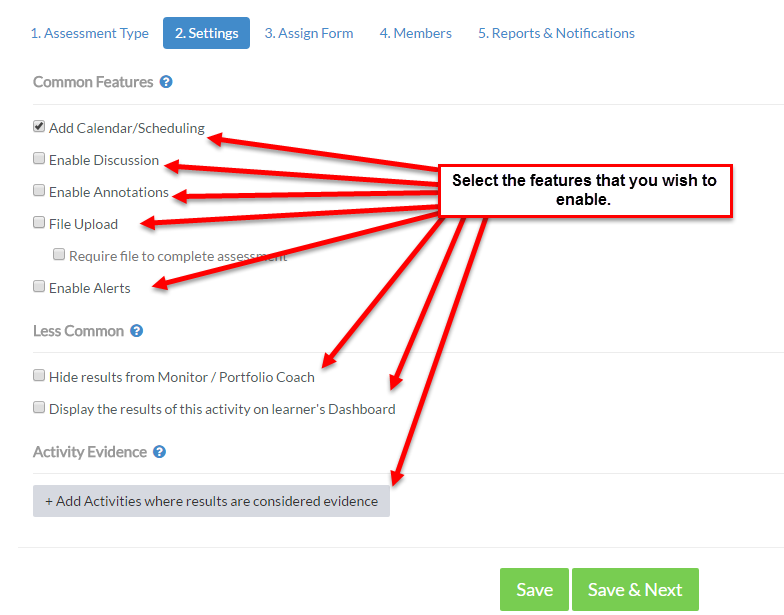
In the second Activity Setting section “Settings”, you will select the features that you wish to enable. Here’s a brief synopsis of each feature:
- Add Calendar/Scheduling allows the Portfolio Coach to associate Calendar time slots with the activity, reserved calendar times show for the student in the activity
- Enable Discussion adds a discussion board
- Enable Annotations enables advisors to annotate specific text answers
- File Upload allows students to upload files for the advisor to review
- Enable Alerts sends alerts about the opening and due date of the Activity
- Hide results from Monitor / Portfolio Coach is utilized to protect student reflections
- Display the results of this activity on learner’s Dashboard is only used in special circumstances, like Portfolio Coach Milestones. If you think your activity should appear on the dashboard please contact OEIT.
- Add Activities where results are considered evidence to choose evidence for this assessment activity. This is typically used in Portfolio Coach Assessments.
Next, select the features that you wish to enable:
When you have finished with Dashboard and Features, click the green “Save & Next” button to continue to the next Activity Setting section. You should briefly see the green “Your changes have been saved” box on the following page to alert you that your changes have been saved. This should appear each time after you save your changes to an Activity Setting section. If this box does not appear, you may have to go back and enter your settings again.
At any time in the setup process, you can navigate to any of the five Activity Setting section by selecting from the tabs at the top of the page. If you should wish to delete the activity and start all over, click the red “Delete This Activity” button.
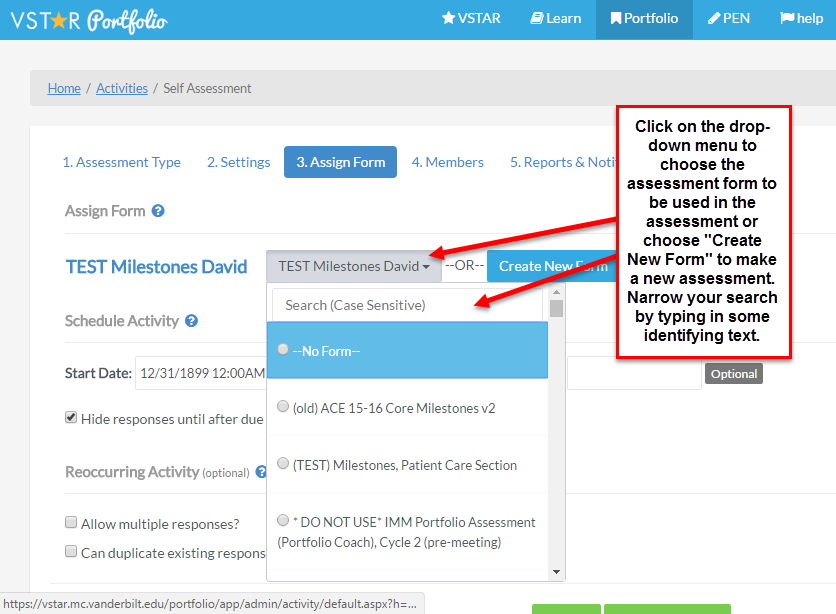
In Step 3 of the activity creation process, we need to choose the assessment form to be used in the assessment. Click on the “Select Existing From” drop-down menu to choose the assessment from existing forms, or click “Create New Form” to make a new assessment. You can narrow your search of existing forms by typing in some identifying text. The search box is case sensitive:
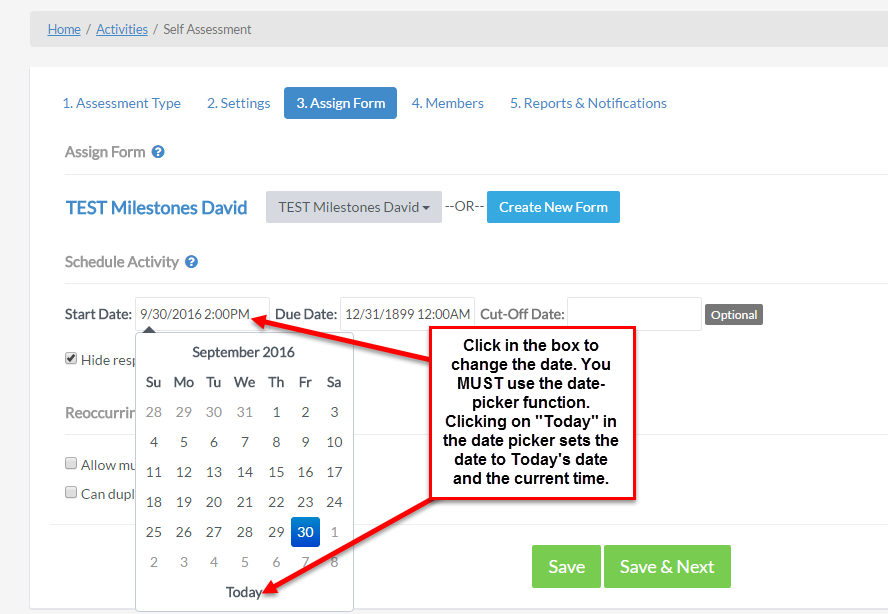
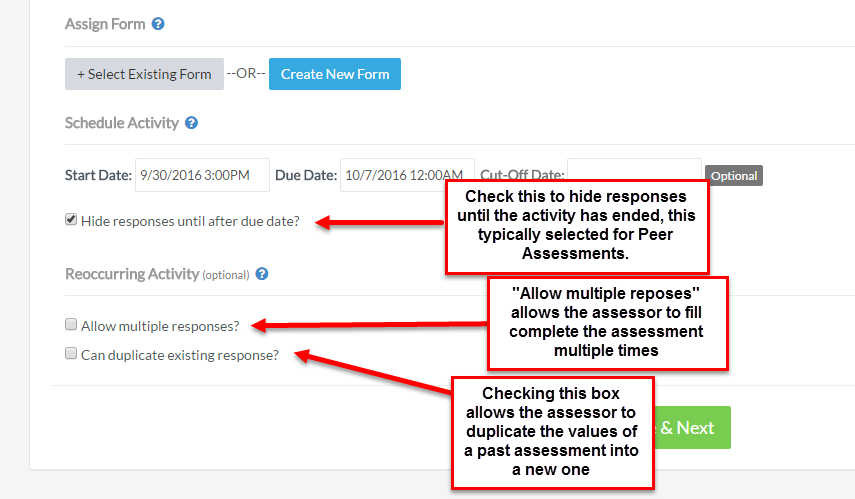
Select the dates that this activity will Start and End. The Cut-Off date is optional, selecting it will allow automatic extensions until the Cut-Off date selected. To change any of the dates, click in the box to right of the label. You can NOT type in the date. You MUST use the date-picker function. Clicking on “Today” in the date picker sets the date to Today’s date and the current time.
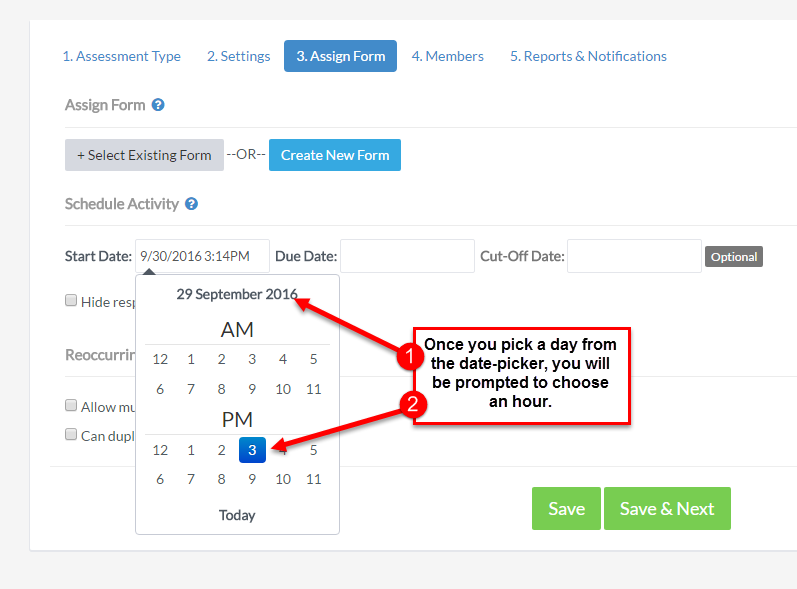
Once you pick a day from the date-picker, you will be prompted to choose an hour:
Once you pick an hour from the date-picker, you will be prompted to choose the minutes. It is common to choose 11:59pm as the minutes for the End Date. The End Date must fall after the Start Date, and the Cut-Off Date must be after the End Date.
Check the Hide Responses box if you want to hide the activity responses from the assessed until the Activity End date, this is commonly selected for Peer Assessment activities.
When you have finished with Step 3, “Assign Form” click the green “Save & Next” button to continue to Step 4 of the activity setup process: “Members”.
Here you can create a new group or attach an existing group. See the VSTAR Help article: Working with groups.
In this example we will add an existing group to this activity by clicking “Edit Groups” and selecting an existing group from the drop-down menu:
Select an existing group from the drop-down menu by checking the box corresponding to the group you want to add. Be sure to select the green “Save” button at the bottom of the page to save your group selections.
In this example we will create a new group for this activity by clicking the blue “Create a New Group” button:
Here you will create a group title with specific identifying information that will be easy to find and provide a group description if needed. Check the “Select if this group can be reused” to use the same group for multiple activities. Be sure to click “Create & Continue” to save your new group and proceed to the next step in the process.
Next, click on “Edit Advisors”. “Updating Group…” will be displayed on the screen while “Getting Options…” will replace “Edit Advisors” in the box while it loads the available advisors. Once loaded, click on the “None selected” drop-down menu and choose one or more Advisors from the list by clicking on them. To remove all members of the group, select the blue “Clear” link. You may also select “Copy & Paste” to add a list of advisor ID’s to the group.
Add Learners, the same as above, click on “Edit Learners”; let “Updating Group…” display while it loads the available learners; then click on the “None selected” drop-down menu and choose one or more Learners from the list by clicking on them. To remove all members of the group, select the blue “Clear” link. You may also select “Copy & Paste” to add a list of member ID’s to the group.
When selecting either advisors or learners from the drop-down list, you can shorten the available list by typing case-sensitive text in the search box that appears at the top of the lists. Be aware if you scroll down in the list and then select a few, you will have to scroll back up the list to clear the search box.
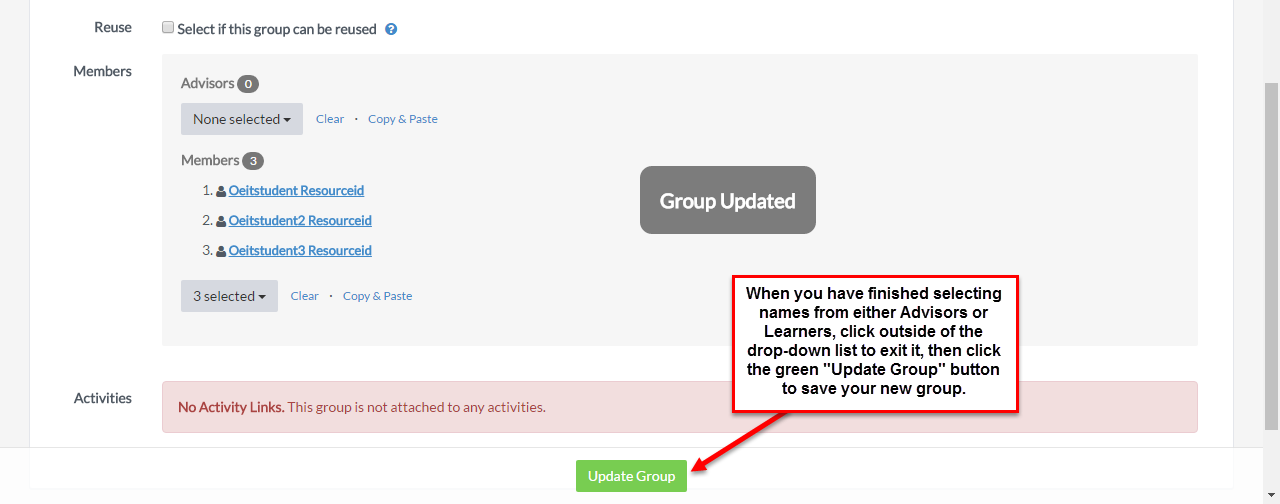
When you have finished selecting names from either Advisors or Learners, click outside of the drop-down list to exit it, then click the green “Update Group” button to save your new group.
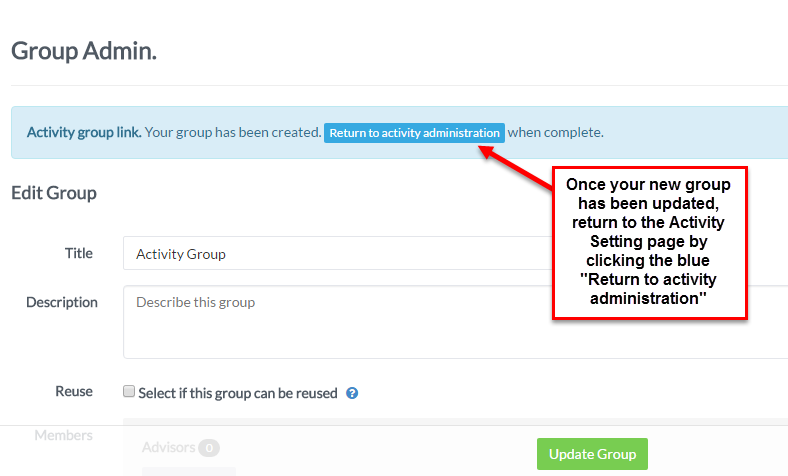
Once your new group has been updated, return to the Activity Setting page by clicking the blue “Return to activity administration” button.
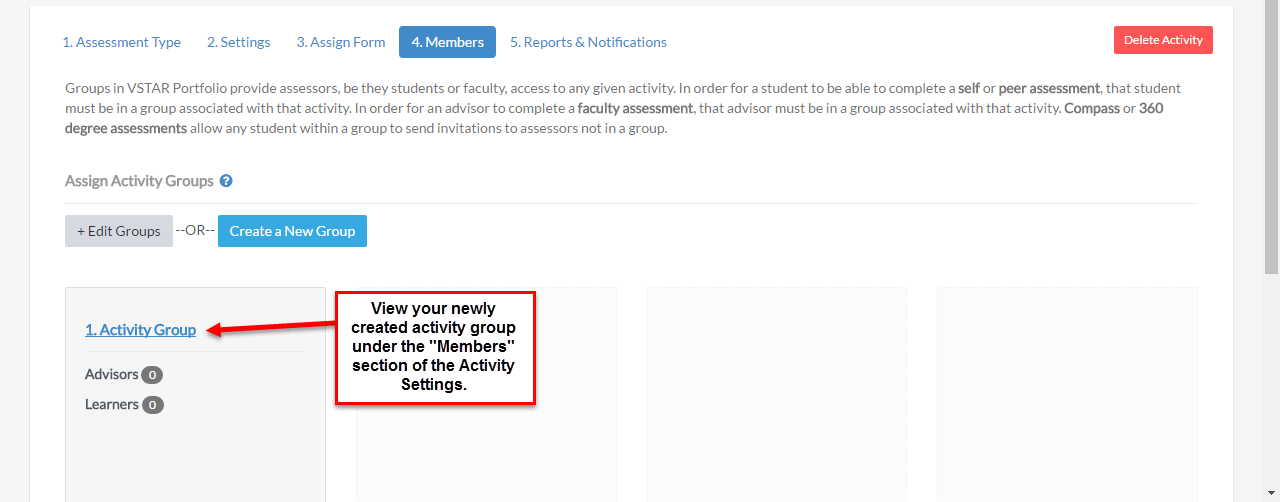
You may now view your new group under the “Members” section of the Activity Settings.
The last of the five sections is the “Reports & Notifications” section.
Depending on the activity you may see up to four reporting options:
- Download learner list – view a list of all students
- Download invitee report – view a list of all those invited in a Compass/Open Assessment and the times that they have responded to the request
- View Activity report – view response and assessments in Excel
- Send notification to activity members – allows admin to remind users of this activity via email
- Alert! This activity is missing key information – view a list of all the key information missing from the activity (shown below)

